Setting up a server for field work#
Warning
This is a provisional document and is incomplete. This setup has not been fully tested. The original version of this document can be found here.
Danger
The information contained in this document is appropriate for the system design as it existed at tagged release: v0.7.925 Future FAIMS releases have changed environment variables and architecture. Do not rely on this document to explain FAIMS3’s current state or design.
Introduction#
This document provides instructions on how to set up a FAIMS 3 server. It targets setting up a device for field work, but does explain a lot of the process required to set up a central server.
The expected physical environment for a field server is one with no or limited access to the wider internet, likely a group of field workers operating on a site. There may be limited power available (generator or limited solar or batteries charged overnight). The field workers will want to sync data from their personal devices (phones/tablets/laptops) and ensure it is saved on a second machine and to share the date between the field workers.
These instructions are intended for someone who is comfortable with executing commands in a Linux terminal window - has a basic knowledge of how to log into a Linux computer and operate at a shell prompt. They (or someone they get assistance from) will need to be able to access which hardware to buy against the actual requirements of the field location
Tip
Please contact info@fieldmark.au if you would like to rent a server or offline server from us instead.
The procedure to work through is:
Setting up the machine - requirements and example installation.
Field Server Hardware Selection#
In most cases, it will be necessary to put some thought into what is actually needed from the server hardware for the particular trip. There are many possible machines which could be used - a laptop may suffice if there is one available. If new hardware needs to be bought then something as simple as a “Raspberry Pi” may be sufficient for a small environment. The next step up might be one of the many small Intel PCs which are available (E.g. MeLE Quieter, but these do have power potential supply issues). Do note that the later will often come with Windows and the initial Linux installation may be tricky (which also applies to Laptops).
| Topic | Statement | Notes. |
|---|---|---|
| OS | Must run Linux | Debian or Ubuntu preferred. One of the derivatives may also work. For a "Raspberry Pi", "Raspberry Pi OS" (based on Debian) will do. Note that depending on your machine, the initial installation of Linux may present issues. For example, on an MeLE Quieter, the author found issues getting the display to work. For all machines which naturally come with Windows (Laptops in particular) you will need to confirm at Linux can be installed on the machine and in particular, that the WiFi system is supported. It must also be able to run in a "headless" mode (no external display). |
| CPU | Intel (or AMD) or ARM | If using an PC style machine - Intel or AMD CPU, then 64 bit is preferred as most modern Linux installations are being written for 64 bit. If using an ARM - for a "Raspberry Pi" or similar 32 bits might be preferred due to lack of memory. But the later "Raspberry Pi" machines are 64bit. |
| Memory | Intel >= 8Gb ARM >= 4Gb |
More is normally considered better but does use more power which may be an issue in your case. For the ARM, 4Gb is the max in a "Raspberry Pi". The OS makes use of memory more efficiently and that should be enough. But it will need at least that amount of swap space as well. |
| Network | WiFi but see notes | This does depend a lot on your field location. In most cases, field worker devices will need to connect to the server using WiFi Most computers which might be considered as a server will have built in WiFi, but they may have limited range compared to what is required. There are many possible WiFi routers which could act as the central network router for the field in question, and there are many ways to extend such WiFi environments, any of which can obtain power from a USB connection (and hence could use a battery). It is strongly recommend that before going into the field, you test the networking configuration locally in as similar environment as possible to where it will be deployed. Whilst in theory the server device chosen above may be able to provide its own WiFi access point, at least in the case of the "Raspberry Pi" implementation attempted, the author was unable to get this working. Additionally, even if it can be gotten to work, it is somewhat dependent on Linux updates, making it fragile. It seems a better approach is a Traveller style WiFi router. These devices are generally available and can implement a flexible access WiFi point. The example implementation below was done with a TP-Link TL-WR802N device, as shown in the picture below. This cost about $40, and can run off USB power. A possible flaw is the range of the device, since it is low powered and doesn't have an external aerial. 
Alternatively, something like the GL.iNet GL-AR300M16-Ext might be appropriate (but has not been tested). This has external aerials and therefore likely longer range and in particular, the aerials appear to be screw in so it may be possible to put this device in a box to protect it, with the aerials extended to outside the box (testing needed). Power in this case is again over USB. 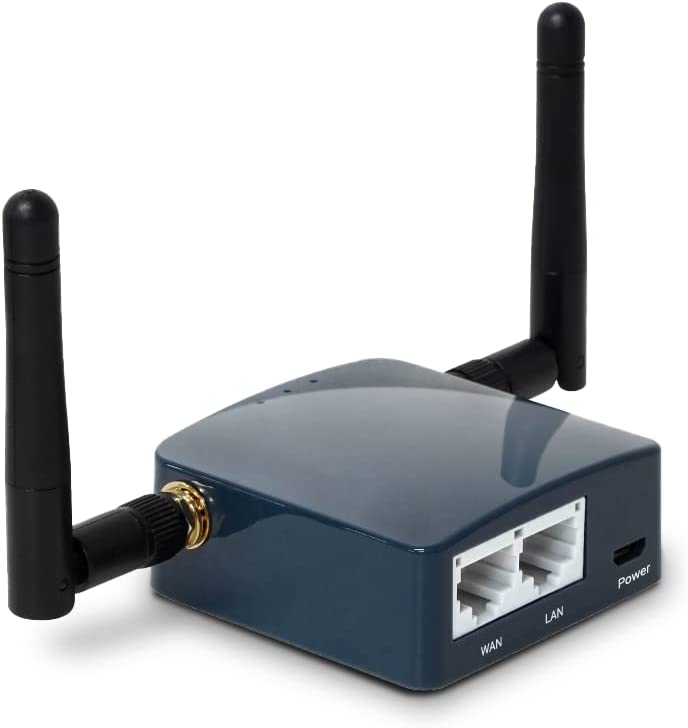
And there are many other possibilities, some of which are likely to be more powerful (longer WiFi range) since they are meant for environments like conferences, but they will then need more power. |
| Power | Field Dependant. | The server chosen (and WiFi router and repeaters) must be consistent with the available power. Here we discuss how this may influence your hardware decision. Mains Power or Generator Available → This provides maximum flexibility in choice of computing hardware. Mains Voltage but from battery + inverter → You will probably need to chose hardware with a lower power draw, but can presume mains voltages are available. Battery only → Here I am thinking of power banks charged elsewhere. Modern versions of these can provide significant amounts of power but often only over USB. Power banks of up to 10,000mAH or even 40,000mAH (Car Jumpstart batteries could be a good source) are available. But beware that most as yet do not support USB-C which may be required for computing solutions. You will have to consider the requirements of your computer and the draw and buy appropriate batteries. There may be other arrangements for field work the author is not aware of. Note that for example, the "Raspberry Pi" may need up to 3A, so a 10,000mAH battery may last only 3 hours, you would probably want the 30,000mAH or higher to last a full day. Do beware that there are limitations on batteries that can be carried in planes doing passenger services, and in most cases, Lithium batteries must be carried with your in-cabin luggage. Solar → I presume here that solar is being used to charge batteries. But there are many possibilities. A further note on potential issues - the MeLE Quieter mentioned above uses a USB-C port for power, but does NOT obey the USB-C Power Delivery specification. As a result, you must only use their power pack to supply it (that is, you need mains power) or you might otherwise need to replace that power pack with something supplying the right voltage and current from the source you have available. This is somewhat frustrating for such a neat little device. So do beware of this type of issue when searching for a machine. |
Keyboard and Monitor |
May not be needed in field | A linux machine can be set up in a headless mode with login over the network. Whilst it would be nice to have the fallback of a keyboard and monitor if issues occur, a correctly set up machine would not normally require this on day to day operations. It is noted that if the computer has a HDMI output, then many Hotel TV units may be able to be used as a display, but you would need to take a cable (and some Hotel TV units may prevent access to the HDMI input). Alternatively, various portable HDMI displays are available, but would need mains power. There are many small USB keyboards (including roll up ones) that could be packed for emergency use. And of course, if you are using a laptop, these are not needed. |
| Packaging | Appropriate packaging for the field is required | Thought must be put into understanding the environment into which this server will be deployed and the packaging requirements resulting from that. For example, whilst a Laptop running linux could implement the server, most laptops cannot be left in an environment subject to dust, rain and hard knocks. Ruggedised laptops are available but are probably less likey to have confirmed linux support. For a "Raspberry Pi", many potential cases are available and it would be easy to construct your own using components available from Electronics Component Stores (E.g. Jaycar), but you need to consider the how power is supplied and WiFi aerials, and what cooling is required. In all cases, when considering packaging, remember to consider what ports really need external access and how to protect them, WiFi aerials and cooling requirements (noting that ventilation for cooling provides potential access points for dust and water - so alternative approaches such as heat sinks, might be needed.). |
| Backup Devices | USB Flash drives/ portable disk drives | You will need to back up your data regularly. The section below on backup procedures talks through this in more detail |
| Spares | Consider | A field location may be a long way from spare parts. Consider what spares to take. E.g. a "Raspberry Pi" and portable WiFi router all boxed nicely might be a $700 investment. Airfares, staff time etc. is a lot more expensive. And with something like a "Raspberry Pi", you can just clone the SD drive and put that in a different device to clone your system. And a typical WiFi router will have an ability to save its configuration file, so again you could clone it. So why not consider taking a full duplicate system? |
WiFi Router setup and machine host name.#
It is recommended that you set up your WiFi router to allocate IP addresses via DHCP, BUT, for the server machine, you should arrange to “reserve” an IP address, known as “DHCP Address Reservation”. This will also the server to leave its WiFi configuration in DHCP mode but ensure when connected to your router, that it always has the same IP number.
Hostname#
You will need a hostname for your machine. Whilst this field server machine is NOT expected to be on the public internet, you will need to be able generate an SSL certificate using a public machine with that name. As a result, the name of your host should reflect what your network people can achieve. In the example, for the Raspberry Pi example described below, the name is “faimsrp1.site.org.au”. We (AAO MQ) are owners of the domain “site.org.au”, so we were able to work with this name.
When connected to your router, can take advantage of “.local” addresses to access the machine, e.g. “faims_rpi1.local”. “.local” addresses are always resolved within your local router’s address space (may not work for Android devices). But this won’t work for FAIMS itself - you will need to use a full domain name - see SSL certificate details below
You will later need a local DNS on your machine containing that full name and to set up your router/device to use this DNS as your primary DNS. This is described in the section ontesting. below.
Operating System and Package Installations#
As we strongly recommend Ubuntu/Debian (Raspberry Pi OS is a Debian derivative), we will list the packages from those repositories. Other Linux distributions may provide the needed packages, but these are untested.
| Package | Ubuntu/Debian name | Notes | ||
|---|---|---|---|---|
| Git | git | Required in order to clone FAIMS3 repositories | ||
| Docker and Docker Compose | docker, docker-compose | Most FAIMS3 components are run in docker containers, started by docker-compose. docker-compose version 1.27 |
||
| HAProxy | haproxy | Load balancer/TLS/HTTP 2 reverse proxy. Needed to handle TLS termination and SNI redirection to FAIMS 3 services Must be complied with "Lua" support. To check this, execute
And the output should include
|
||
| DNSmasq | dnsmasq | DNS/DHCP server. So we can provide a DNS server | ||
| Text Editor (e.g. nano, vim) | nano | Required to edit configuration files. Most likely available by default. | ||
| Telnet | sudo apt-get install telnet | Optional, To help with testing | ||
| Locate | sudo apt-get install locate | Optional, Helps in finding files. But does use resources! | ||
| Dnsutils | sudo apt-get install dnsutils | Optional, adds "dig" and "nslookup" commands and others, used to work with DNS. |
See Raspberry Pi installation instructions below for full details for the example install on that machine.
Installing FAIMS#
Once you have set up the required OS packages, you can start cloning the FAIMS3 Git repositories. In production, you should only run tagged versions—running untagged versions may result in data loss. Whilst in theory you can set the components up in any order, the order we will follow will allow you to confirm that each component is running and ensure a working system at the end.
Note that FAIMS is run in “Docker” containers. Notes on the design are available below and a list of notable docker commands are available.
Each repository should be cloned into its own directory. The path where you clone the git repositories to does not matter, but the user you are running as must be able to run docker, either via calling sudo (easiest option), or by being able to access the docker socket (see the docker documentation or your OS for how to do this).
Installing the FAIMS3 conductor/database#
The conductor program handles authentication and authorisation for the FAIMS 3 system. To download it, clone https://github.com/FAIMS/FAIMS3-conductor. Feel free to read the README included in the repository for more details about the conductor. The building of the package also adds the CouchDB database
|
Once cloned, you will need to do some initial setup before running docker-compose.
Note
if you have previously built on this machine, you may
probably want to execute sudo docker-compose down --rmi all at
this point to force a complete rebuild. And in that case, just rework
your .env file instead of starting from scratch.
First, copy .env.dist to .env—this is the configuration file that docker-compose will read to configure both the FAIMS3 conductor, and CouchDB, which is the database/syncing system that FAIMS 3 uses.
Next, edit the .env (Example used on Raspberry Pi) file based on your desired settings. The .env.dist file should provide enough guidance and defaults for some initial experimentation. A list of the changes made in the example are available below. You will need to set hostnames/ports for the services (these will need to match the configuration you use for HAProxy later on), which SMTP server to send emails through (can be ignored if there is no internet and hence no way for users to receive emails), and set some secrets/passwords used to communicate with services.
(The FAIMS_COOKIE_SECRET value can be set to the value of the uuidgen command on a Mac (and probably many Linux machines, not apparently available on Raspberry Pi) or from https://www.uuidgen.org/v/4)
To ensure the FAIMS Database is saved across rebuilds of the container, you must locate it outside the container. Do do this, add the following to docker-compose.yml (the ports: specification is for content, it is the “volumes” specification you need)
|
Then create a directory, e.g. $HOME/couchdb, where the database will be saved. Specify that value as the value of the COUCHDB_DATA_DIR variable in .env.
Note
if you have previously built on this machine with that database directory, the values won’t be updated to reflect any changes here. You can just delete the contents using “rm”, but then you will lose everything.
Once the .env file is ready, run ./keymanagement/makeInstanceKeys.sh. This generates the signing keys used to allow users to log into CouchDB, and configures the CouchDB instance to use those keys.
Then run “sudo docker-compose up -d” which will build and start the docker containers running the conductor and CouchDB. Note that this process will take some minutes to complete (but there is caching involved, so subsequent builds will be quicker). I have timed it at more then 7 minutes on a RaspberryPI, and it does spend a lot of time on the part of the build involving “npm” packaging.
Then you must create the database in the running system. Execute: “sudo docker-compose exec conductor npm run initdb”
To check if the docker containers are running - execute “sudo docker ps”. E.g (for a running system)
|
Checking results#
To confirm that both containers are correctly serving the services by accessing them at the ports you have chosen in a local web browser. The conductor should be asking you to log in, whilst the CouchDB container should return a welcome message encoded in JSON. By adding /_utils/ to the URL that CouchDB is running at, you should see its interface, named Fauxton, and be able to log in with the credentials you provided in the .env file. You can also directly access the couch directory database used by the system to find conductor - and this should contains the public address for conductor
Using an .env file based on the attached file, these are the addresses to check
localhost:8080 → For conductor
localhost:5984 → For CouchDB
localhost:5984/_utils → For CouchDB for Fauxton (Page title says “Project Fauxton - login”
localhost:5984/directory/_all_docs?conflicts=true&include_docs=true → Checks the database details used by Web-App to find Conductor. Results should include the external address of conductor.
Conductor/Couch Db Environment suggested variables to change#
These are the variables in the Conductor .env file which were set in the example.
| Variable | RPI Setting | Notes |
|---|---|---|
| COUCHDB_USER | Username used by Web app to log into Couch Database | |
| COUCHDB_PASSWORD | Password used by Web app to log into Couch Database | |
| COUCHDB_PORT | 5984 | The (internal to the Docker container) port number that CouchDB will use |
| COUCHDB_EXTERNAL_PORT | 5984 | The "external to the Docker container" port number that CouchDB will use. Note - only external to the container, not to the machine. |
| COUCHDB_PUBLIC_URL | https://faimsrp1.site.org.au:1002 | The public URL that Couch will be available at. Note that haproxy will be responsible for connecting this SSL port to the http port specified by COUCHDB_EXTERNAL_PORT Must be consistent with the values in REACT_APP_DIRECTORY_HOST and REACT_APP_DIRECTORY_PORT in the WebApp .env file. The main FAIMS system does not specify port here, but uses a specific hostname for the CouchDB system. |
| COUCHDB_DATA_DIR | /home/faims/couchdb | Where the Couch Database will be stored. Also note that changes to docker-compose.yml required to ensure this takes effect - see above. |
| CONDUCTOR_EXTERNAL_PORT | 8080 | The "external to the Docker container" port number that Conductor will use. |
| CONDUCTOR_PUBLIC_URL | https://faimsrp1.site.org.au:1001 | The public URL that Conductor will be available at. Note that haproxy will be responsible for connecting this SSL port to the http port specified by CONDUCTOR_EXTERNAL_PORT The main FAIMS system does not specify port here, but uses a specific hostname for the Conductor system. |
| WEB_APP_PUBLIC_URL | https://faimsrp1.site.org.au | The public URL that the Web Application will be available at. Note that haproxy will be responsible for connecting this SSL port (443) to the http port specified by WEB_APP_LOCAL_PORT in the WebApp .env file. See below. |
| CONDUCTOR_AUTH_PROVIDERS | datacentral | Either "datacentral", "datacentral,google" or "google". Determines some other variables below that you may need to set - see below. |
| CONDUCTOR_EMAIL_FROM_ADDRESS | noreply@localhost.test Proper value TBD |
Presumes we have an SMTP connection, not set up as yet. |
| CONDUCTOR_EMAIL_HOST_CONFIG | smtps://tjf@smtp.aao.gov.au Proper value TBD |
|
| COMMIT_VERSION | <<From command>> | From output of 'git rev-parse HEAD' |
| FAIMS_COOKIE_SECRET | <<From command>> | From uuidgen on Mac (not apparently available on Raspberry Pi) or from https://www.uuidgen.org/v/4)smtps://tjf@smtp.aao.gov.au |
| DATACENTRAL_CLIENT_ID | My values were given to me by James Tocknell. Generating them will need the correct hostname and a wildcard for the port number. | |
| DATACENTRAL_CLIENT_SECRET | ||
| DATACENTRAL_GROUP_PREFIX | ||
| GOOGLE_CLIENT_ID | Not used in example | Google Developer tools allow you to generate these. A walkthrough is available at this site. |
| GOOGLE_CLIENT_SECRET | Not used in example |
Restarting if required#
There are instructions below for how to automatically restart these services after a reboot. If you need to do so manually, then go to the directory with the container git repo and invoke
|
Potential errors during this process#
Quick failures of conductor container.#
If conductor quickly fails (within a minute of so) of being brought up, then it is likely that you have not run “makeInstanceKeys.sh” after changing .env. Resolve by executing “sudo docker down –rmi all” and then restarting the process from the point of running “makeInstanceKeys.sh” .
Database is empty#
On doing the database check above, you get this page:
{“error”:“not_found”,“reason”:“Database does not exist.”}
This likely indicates you have not initialised the database. You can (must) do that on the running system,
Conductor/Couch Db Configuration/Build Sequence Summary#
|
Also see the details on auto-restart after boot below.
Installing the FAIMS3 web application#
The FAIMS3 web application is not a required component of FAIMS3 (as it is possible to solely work with mobile clients when collecting data), however it is strongly recommended that you run it so that laptops/desktops can see and edit data. It also helps a lot with testing as you set things up.
The web app setup follows a similar process to the conductor.
First, clone the web app repository from https://github.com/FAIMS/FAIMS3 and select the desired tag.
|
Next, copy .env.dist to .env—this is the configuration file that docker-compose will read to configure the web application build.
Note
if you have previously built on this machine, you may
probably want to execute sudo docker-compose down --rmi all at
this point to force a complete rebuild.
Edit the .env file to your desired settings —these should be consistent with those given in the .env file you specified for the conductor above. A list of the changes made in the example are available below.
Finally, run “sudo docker-compose up -d” which will build and start the docker container running the web app. Note that this process will take some significant time to complete - I have seen it take 70 minutes (on a RPi but with a good network connection). There is caching, so subsequent builds will be a lot quicker. It is also very resource intensive and will dramatically impact the performance of say an RPI, particularly when creating the optimised build
Restarting if required#
There are instructions below for how to automatically restarted these services after a reboot. If you need to do so manually, then go to the directory with the container git repo and invoke
|
Potential errors during this process#
Socket Timeouts with the suggestion of proxy issues have been seen a number of times
These appear to be intermittent and possibly due to issues with fetching one particular package.
You just need to try again with this. If the same package always fails, it may be some issue with the remote archive that is being used and you may need to try again tomorrow.
Failed with react-scripts build#
Next got a failure with the react-scripts build
|
This was within “Step 26/30 : RUN npm run-script build”
This was resolved by increasing the swap space (See RPi swap space instructions below, probably similar in other modern Linux machines.).
No space left on device#
Plenty of general possibilities, but if by /var/lib/docker/overlay2 is a lot of the space used (possible if you have rebuilt the docker images a lot of times), then try:
|
Reference web link.
You can use
|
To see see the usage by docker.
Checking results#
Then confirm that the container is correctly serving the web app by accessing it at the port you have chosen in a web browser (e.g localhost:3000 for the example port allocations). You should get the FAIMS front page.
You will find that the web app cannot find the conductor (sign-in won’t work) or the database—this is because we have not yet set up the reverse proxy which handles TLS and port remapping.
FAIMS WebApp Environment suggested variables to change#
These are the variables in the WebApp .env file which were set in the example.
| Variable | RPI Setting | notes |
|---|---|---|
| REACT_APP_COMMIT_VERSION | <<From command>> | From output of 'git rev-parse HEAD' |
| REACT_APP_DIRECTORY_HOST | faimsrp1.site.org.au | The public host name that CouchDB will be available at, must be consistent with the setting in COUCHDB_PUBLIC_URL above. |
| REACT_APP_DIRECTORY_PORT | 1002 | The public port number that CouchDB will be available at, must be consistent with the setting in COUCHDB_PUBLIC_URL above. |
| WEB_APP_LOCAL_PORT | 3000 | The local port the web application will be made available at. |
Web Application Sequence Summary#
|
Also see the details on auto-restart after boot below.
Enabling docker image startup after reboot.#
To enable the docker images to restart when the machine reboots, you need to use the “docker –restart=always <container>” command. You can get the container names with the “docker ps” command. For example:
|
Warning
You will need to repeat this after rebuilding the containers - since the the result is a new container and the ID changes
This requires that docker itself is being restarted on system reboot. This should be done by default, but if not, then use
|
The status of the service can be fetched with
|
Configuring the machine#
This section covers the rest of the process in configuring the machine to run FAIMS. You will need to obtain an SSL certificate and set up HA Proxy.
SSL Certificate.#
You will need an SSL Certificate for your installation. A Self Signed certificate does not work.
To get a certificate, you must have a public web-site with a DNS entry that the certificate service can access. Once we have the certificate, you are right until it expires. (90 days for one from LetsEncrypt). To get a certificate, you will need a temporary public web site (say running on a VM) on a domain you control. You then create a DNS entry for the machine you are setting up (e.g. faimsrpi1.site.org.au) and point it to the basic web site, where you can do what we need to for the certificate creation service to work.
Then you can use a certificate creation service such as LetsEncript to create your certificate. Tar these up and save them
Do be wary that some (all) services (e.g. LetsEncripts) install these in the live directory as symbolic links and by default tar will not grab the actual files. You may want to use the “-h” option (to follow links) when taring them up.
Then once you have the certificate, you can save it and shut down the machine with the temporary web site. You could of course do this on the actual machine you are setting up, but then you would need to install a web server on it and make it publicly available.
Do keep the temporary machine around so you can update your certificate late.
Warning
Note the expiry date of the certificate so you can update it before it goes out of date.
Configuring HAProxy to talk to the containers#
HAProxy is being used to implement the reverse proxy needed by FAIMS. It is in front of back-end applications and forwards client (e.g. browser) requests to those applications.
See HAProxy Docs section 3.3 for details on what HAProxy can do.
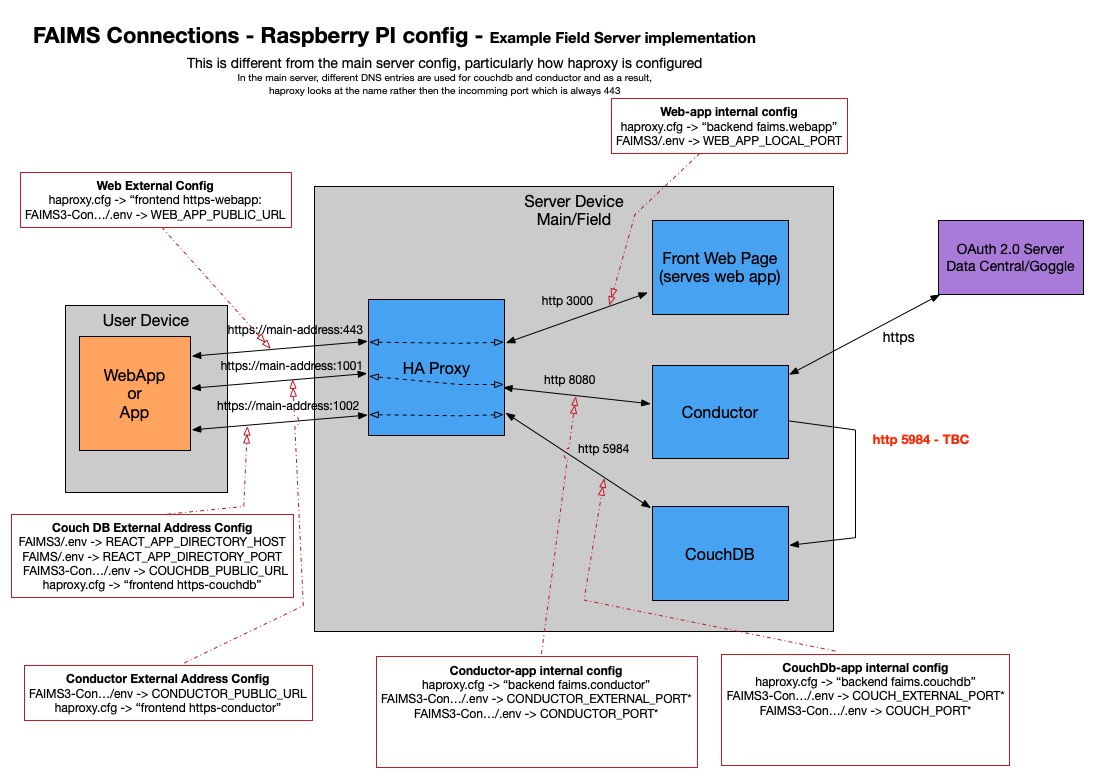
For FAIMS, the browser needs to talk to three applications on the server
The WebApp, Conductor and CouchDB. The job of HAProxy is to convert from SSL (https) protocol to http and forward requests to the WebApp, Conductor and CouchDB applications, each of which are running in separate Docker images. HAProxy is also involved in allowing Conductor and CouchDB to return data to the WebApp.
Field System HAProxy config vs main system config.#
The main purpose (in FAIMS) of HAProxy is to connect the public interfaces (“frontend”) of FAIMS to the “backend” services running in docker images in the machine.
In the main FAIMS system HAProxy configuration, each of WebApp, Conductor and CouchDB have their own DNS entries all of which point to machine running FAIMS. The HAProxy “frontend” configuration provides a “use_backend” specification to select the backend based on the DNS name. The “backend” name (with the HAProxy configuration) will be the DNS name of the component. For example, in the FAIMS 3 testing configuration, the CouchDB address is testing.db.faims.edu.au, as a result, there is a back-end named testing.db.faims.edu.au. (Note that the attached example is very complicated, there is a lot running on that machine including various versions of FAIMS).
In a field system HAProxy configuration we don’t want (need) multiple DNS names (we don’t really want any DNS name but SSL Certificates!!!!). Instead we will select the backend via a port number. The HAProxy configuration specifies three separate frontends - one for the default SSL port (443) which is where the WebApp will connect. And one each for the Conductor (port 1001) and CouchDB (port 1002) public address port numbers. Each of those connect to a their own backend using a default_backend specification.
HAProxy CORS#
To prevent security issues, web applications will normally prevent data from one system being passed to another system. For example, in FAIMS, the Web Application (in the example, at https://faimsrp1.site.org.au ) will make a call to the couchDB (at https://faimsrp1.site.org.au:1002). By default, the web application would not be able to access the couchDB data. This is known as “Cross-Origin Resource Sharing” and is potentially dangerous (security wise). The lock is within the code running in the browser (E.g. the FAIMS Web Application)
But, it is often necessary to allow this and is in the FAIMS case. As implementers of the system, we know that it is acceptable for https://faimsrp1.site.org.au to access data from https://faimsrp1.site.org.au:1002. The way around this is to put various items in the headers of the messages from couchDB, these items allow the Web Application to access the data.
The main system HAProxy configuration file uses this combination of lines in its “frontend” configuration to handle this.
|
In the field system, this approach doesn’t work in all cases. Instead we add the following lines to each of the Conductor and couchDB frontends
|
Note that the machine name is specified in the “Access-Control-Allow-Origin” line. The web-app frontend specification can be simplified compared to Conductor and couchDB.
Installing the SSL Certificate for use by HAProxy#
First create the directory to place it in:
|
For reference, that this is the part of the HAProxy configuration (below) that is specifying that directory (appears in multiple frontend specifications)
|
Code Block 1 SSL specification in haproxy.cfg
In particular, it is the “crt” setting here you are interested in. Details are available at https://www.haproxy.com/documentation/hapee/latest/onepage/#5.1-crt
Installing the certificate files#
LetsEncript created the following files
cert1.pem chain1.pem fullchain1.pem privkey1.pem
See https://certbot.eff.org/docs/using.html#where-are-my-certificates for details on these.
Concatenate fullchain1.pem and privkey1.pem into the one file, name of your chosing but with filetype .pem. E.g.
|
Place the resulting file in /etc/haproxy/ssl
Warning
The computer’s host name (in /etc/hosts) must match the certificate including the domain. You need to insert an entry for your machine in /etc/hosts. E.g.
|
(Why 127.0.1.1 instead of 127.0.1? Web stuff pages on this does indicate it should be .1.1. You will eventually need the actual IP address of the machine there.)
HAProxy config file#
Copy the attached file haproxy.cfg to your home directory. If you have changed the port numbers used internally or to be used externally, then you will need to update this file. The table below gives the defaut values in that file and which were used in the example Field Server implementation.
| Internal Default | External default | |
|---|---|---|
| Web application | 3000 | 443 |
| Conductor | 8080 | 1001 |
| CouchDB | 5984 | 1002 |
Search for the relevant value and replace with what you have chosen.
HAProxy restart#
Having created the above files, execute the following commands.
|
If you get an error when starting, then you probably want to have a look at the file “/var/log/haproxy.log” (The suggested commands for looking at the error - “systemctl status haproxy.service” and “journalctl -xe” normally don’t provide much information of use, at least in the examples the author dealt with). You could also use “haproxy -c -f /etc/haproxy/haproxy.cfg” to check the config file without trying to start the server.
Configuring DNSMASQ to provide DNS.#
We must have a local DNS (Domain Name Server) so that field devices can find the components of FAIMS using the name associated with the SSL Certificate. The “dnsmasq” application is probably the best approach for this.
Dnsmasq is a lightweight, easy to configure, DNS forwarder and DHCP server. It is designed to provide DNS and optionally, DHCP, to a small network. It can serve the names of local machines which are not in the global DNS. We will not be using the DHCP side of it - since the WiFi router will provides that.
For an example installation - see RPi dnsmasq installation.
DNSMASQ configuration#
First you need to make some modifications to the default dnsmasq configuration
Dnsmasq’s config file is usually located at /etc/dnsmasq.conf. This is pre-populated with initial settings. Find and uncomment the following lines:
|
Here’s what these settings are enabling:
domain-needed – This stops Dnsmasq from forwarding local names without a domain part to the upstream DNS server. In our installation, it means example.com will be eligible for resolution via Google but example or web-server will not. It reserves dot-less names for your local network.
bogus-priv – Prevents forwarding DNS reverse-lookup queries to the upstream DNS server. It means internal IPs like 192.168.0.101 will never be exposed to Google. Not enabling this could unintentionally leak the architecture of your internal network to your upstream provider.
Then restart the service using
|
Configuring Devices/Router.#
You now need to ensure each device which will access the field server or field server WiFi router knows the DNS to use. This is device/router specific and this page provides details on how to change which DNS server your device/router is using. Do note that the Author had issues when he did this in the WiFi router, but it worked ok when done at the device level.
Syncing data with a central server#
Initialising your database from a central server#
In the example below, I am using my example Raspberry PI field server (faimsrp1.site.org.au), and the database csiro_geochemistry which is present on the main system.
As per the example above, couchDB is running locallyon port 5984. Log into the CouchDB “Fauxton” interface from a browser local to the field server (i.e. run the browser on the machine, this won’t work if you connect remotely (HAPROXY SSL validation error)). In this example, it can be found at
|
NOTE, “http”, NOT “https”
The user name and password are from the variables COUCHDB_USER and COUCHDB_PASSWORD in your conductor .env file
Creating the databases#
Use the “Create Database” button in the top right to create two empty databases. One will be named “data-<source-db>” and the other “metadata-<source-db>”, with <source-db> matching the main system database you will be using. E.g. databases data-csiro_geochemistry and metadata-csiro_geochemistry. In both cases, go back immediately to the main window. You should see something like this image:
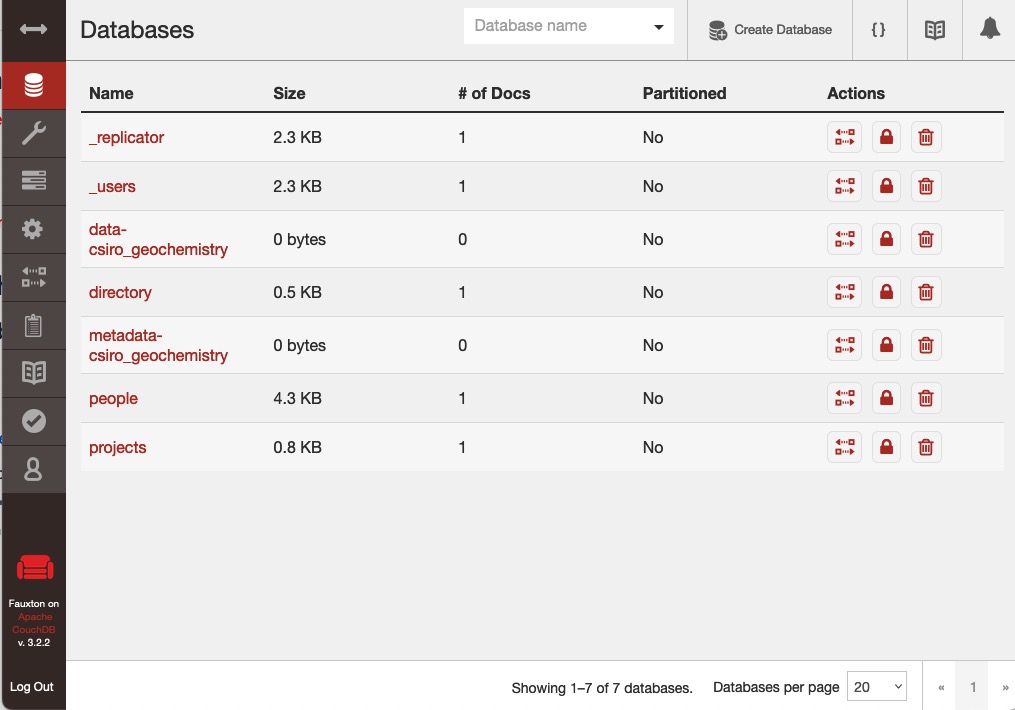
(You can always use the “Databases” button”, second town from the top left, to return to this display.
Copying the databases from the main server#
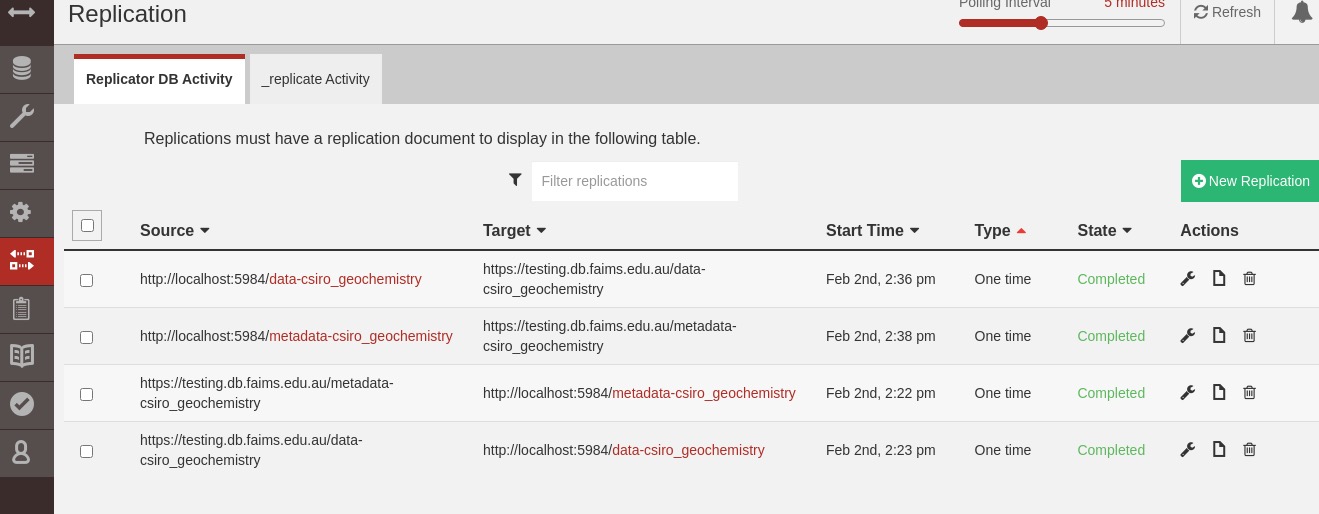
Then for each database, you will need to replicate it from the main system. The
 button to the left is the
replication button. Invoke that and then “New replication”. Set it
up as follows:
button to the left is the
replication button. Invoke that and then “New replication”. Set it
up as follows:The “Source Type” should be “Remote database”
The “Database UR:” should be the remote database full name (E.g. https://testing.db.faims.edu.au/data-csiro_geochemistry or https://testing.db.faims.edu.au/metadata-csiro_geochemistry)
“Authentication” should be “Username and Password”
You will need to get username and password details for the remote system from a friendly person who trusts you
The “Target Type” should be “Existing local database”
The name should be the appropriate local name (E.g. databases data-csiro_geochemistry and metadata-csiro_geochemistry)
“Authentication” should be “Username and Password”
You should enter the local user name and password.
Options can be left at the default (or continuous - but you won’t want continuous when you go in the field - it will cause a hang when the field device connects. Continuous will ensure the DB is updated regularly, e.g. every 5 minutes.)
Invoke “Start Replication”
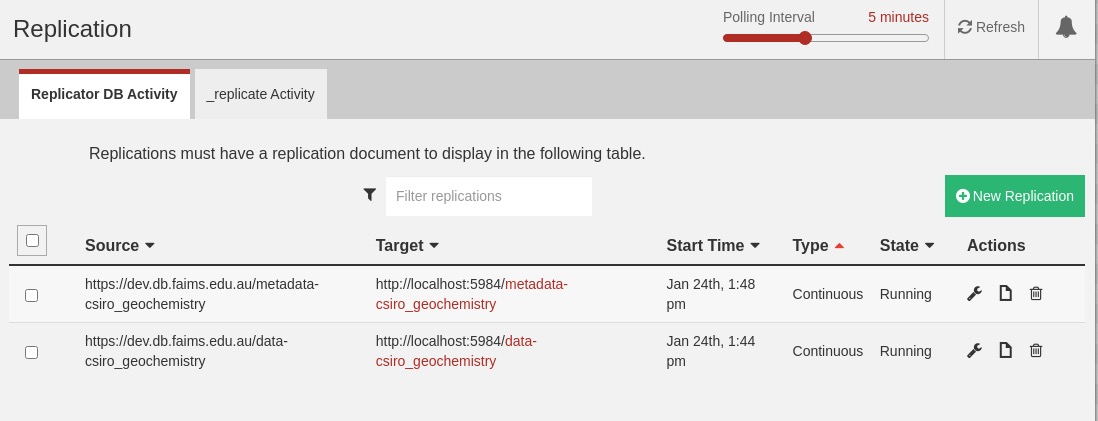
Then repeat for the other database. The Replication screen should (after a refresh - button towards the top right) show something like this:
Potential Issues#
You might be trying to use “https” rather then “https” when connecting your browser.
Misspelled database names or user/password.
At some point, I found the target DB to have changed to the machine name, which confuses the main remote system.
I’m not certain, but you may need to run a browser on the machine rather then using a browser on an alterative machine to talk to the field server Faulxton.
To debug this ,it was useful to connect to view the logs of the container. E.g.
|
Adding the FAIMS database to the projects data#
At this point, you need to add this database to the projects database by adding a new document. You can fetch the foundations of this document from the main database. In this example, we want the document “csiro_geochemistry”. Fetch it using:
|
Back on the field server Fauxton interface, open the “projects” database. Invoke “Create Document”. Replace the template with the contents of the file BUT WITHOUT the “_rev” item.
If you open the created document, its structure will be like this:
|
Setting up permissions#
The various Admin and User permissions must be set up. These need to be set up for both the data_* and metadata_* databases.
First open up Fauxton on the main system. For one of the two databases,
select the “Set Permissions for” button  . This
will open the “Set Permissions” screen, as per below
. This
will open the “Set Permissions” screen, as per below
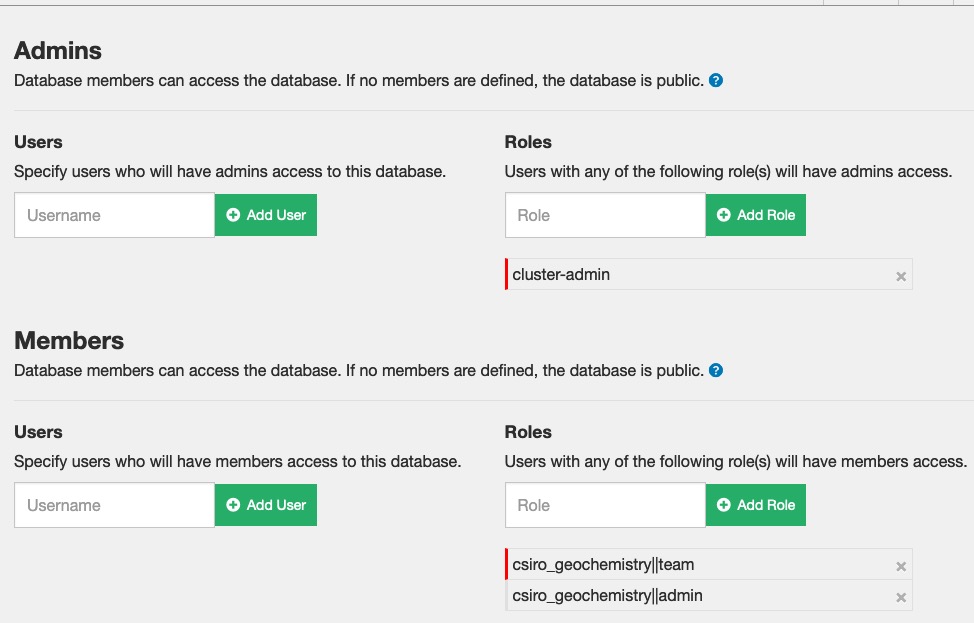
You can see that there are “Roles” listed for each of “Admins” and Members”. A role is in effect, a permissions group (associated with your login account at the Authentication Server). So in this example, users with admin privileges are put in the “cluster-admin” role. Uses who have normal “Member” roles are put in one of the “csiro_geochemistry||team” or “csiro_geochemistry||admin” groups. The groups are user is in are set up in the authorisation server.
So having worked out which Users/Roles require access - open Fauxton in the Field Server system (Again via the local browser) and add the permissions to each of the data_* and metadata_* databases.
You should now be able to access field server from a remote device (which otherwise knows the field server name).
Syncing back to the main database#
The process is essentially the same as the process above for copying the data across from the main server. The exception is that you reverse the directions (Target is the remote machine, Source is the local machine).
Do remember to log into the CouchDB “Fauxton” interface from a browser local to the field server (i.e. run the browser on the machine, this won’t work if you connect remotely (HAPROXY SSL validation error)). In this example, it can be found at
http://localhost:5984/_utils/#login
This image shows the results after setting everything up.
Replication Config Changes when going on/off line.#
Warning
Edit replication configuration to make them once-only before going off line. You might then want to move back to continuous when the system is back on-line.
Connecting the iOS/Android Apps to use this server#
The Apps as built talk to a particular machine to find out which “Workspaces” they will make available. You need to ask support for that system to add an appropriate entry into the “directory” database on the main server. They will need the IP address and the relevant port numbers for Conductor and CouchDB. For the example, the entry will look like this:
|
Note that the WebApp address (plain “faimsrp1.site.org.au” is not listed as the Apps don’t need access that. Here is the description of each entry:
|
Putting it all together.#
I turned on my portable router/WiFi system. Connected to the wider network. In my case I was able to plug it in via Ethernet, which makes it easy to then disconnect later.
I connected the Field Server to the portable router system (WiFi connection)
I confirmed the Field Server had Internet Access.
Determined the IP address of the Machine (e.g. “ip -br addr”, looking for the wireless interface, often something like “wlan0”. )
Logged into the WiFi router admin page
In the Router Admin interface - enable DHCP Address reservation for the machine. Normally you can find it via its IP address. If you need its “MAC” address, then the “ip addr” command can be used - look for the “link/ether” value. (The exact approach depends on your Router. You probably need to go into advanced settings)
In your field server - make the IP address the address for your machine in /etc/hosts.
Looks like this caused problems. I had to remove this and then add it after restarting and connecting to the wireless and then doing “sudo service dnsmasq stop; sudo service dnsmasq start”
In the Router Admin interface - make the field server IP address a DNS server address for the router.
This seems to cause problems in my example, Only got it working by modifying DNS on the device, not the router. See this page on how to do this.
Reboot the field server, check it comes up ok and with the right IP address (Note - ensure it connects to the correct WiFi router if you had previously been using another one - if knows about another local WiFi router that has internet access it might connect to that first, you might need to forget that one.) It could take a minute or two for the server to fully reboot.
Note - if you have issues you might need to put /etc/hosts hosts back to the way it was, reconnect to the WiFi and then change /etc/hosts again. If you do, then you will need to execute “sudo service dnsmasq restart” to restart the DNS.
At this point, using a user device, connect to the portable WiFi router (whilst the portable WiFi device is connected to the wider internet). Try connecting to the FAIMS front page (In this example https://faimsrp1.site.gov.au . Note that you may need to specify with https:// prefix, e.g. https://faimsrp1.site.gov.au rather then just faimsrp1.site.gov.au. Login and add the Database.
If using an iOS/Android App, you will need to use the “User” window (select from the menu on the left). If the details have been refreshed correctly, the machine will appear and you can invoke SignIn. E.g the “SIGN IN” button to the right of the following image. (Update for latest changes)
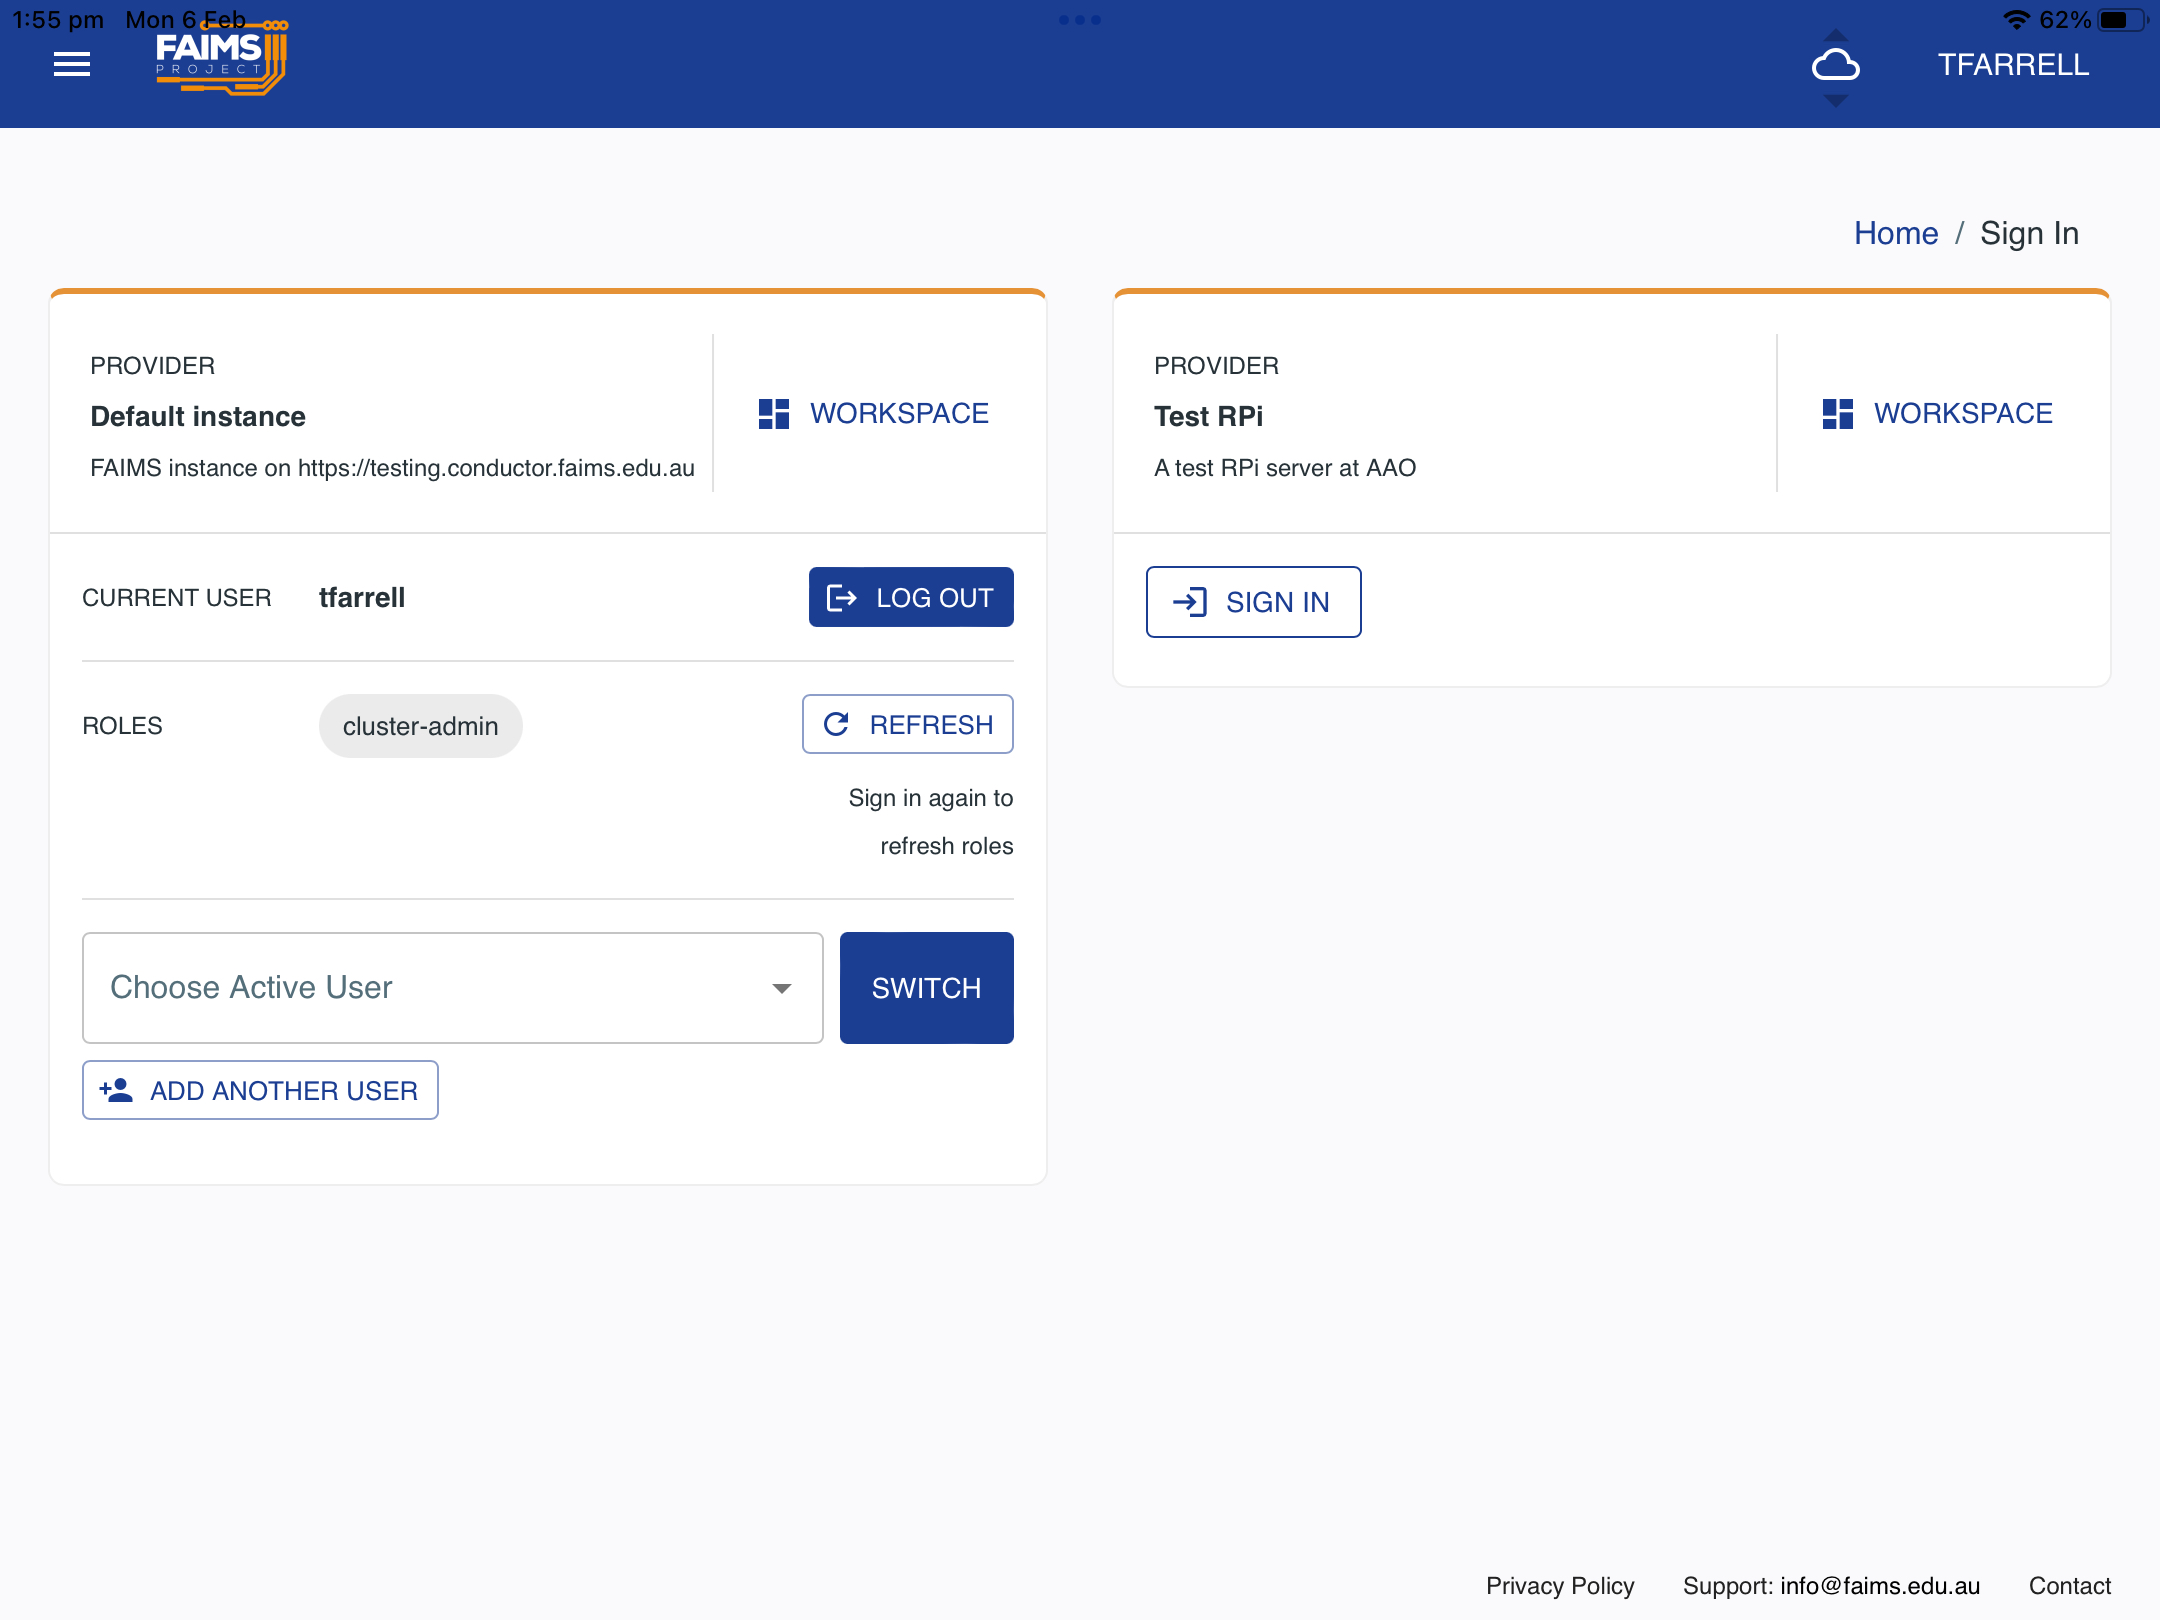
Login and add the Database.
Now disconnect the portable WiFi from the wider internet. Attempt to refresh on your portable device (From the FAIMS “About Build” window, reset the DB and then refresh the application. Sign back in (you should not need to sign back into Data Central, if you do, then things are wrong. Activate your notebook. It should re-sync at this point (If not - one possible cause is that the Fauxton DB interface has replications set up in continuous mode, change it to single mode - see above for more information).
If using the App, it can take a long time to complete, you will need to use the above Sign In screen again (Why?) but it doesn’t need access to the Authentication Server. AND IT DOESN’T ALWAYS WORK!! I THINK THAT IS MOSTLY AFTER A REBOOT OF THE FIELD SERVER!!)Needed to rename database,
Now add a entry to your notebook and publish it. Connect another device/browser and confirm the new entry is available.
After ensuring the docker images will restart when the machine restarts , shutdown your server, disconnect its display and then reboot. Give it a few minutes to settle down and then try go to your device and invoke the “refresh” button - check the refresh succeeds (it quickly completes).
Now check it all works with your field power supply and your actual in-field packaging, including checking the WiFi range is sufficient.
Check with both browsers and iOS/Android Apps.
Finally check your backup procedures work and backup the machine.
Done!server-images/image12.pn But you are going to recheck all of this a few times!
Note - the Docker Commands and System Design sections below are all of potential use if things are not working.
Danger
Beware of the expiry date of your SSL Certificate. It may only be 90 days, so you need to arrange for it to be renewed and at the right time, installed and tested. The author suggests arranging renewal as close as possible before going to the field and doing a final check after installing the updated version.
Warning
All users must login to FAIMS before offline use
That is, they must login to the server from the device they intend to use it from, for the first time, whilst the WiFi router is still connected to the wider internet. Please ensure this is part of the pre-departure (to field) project procedures.
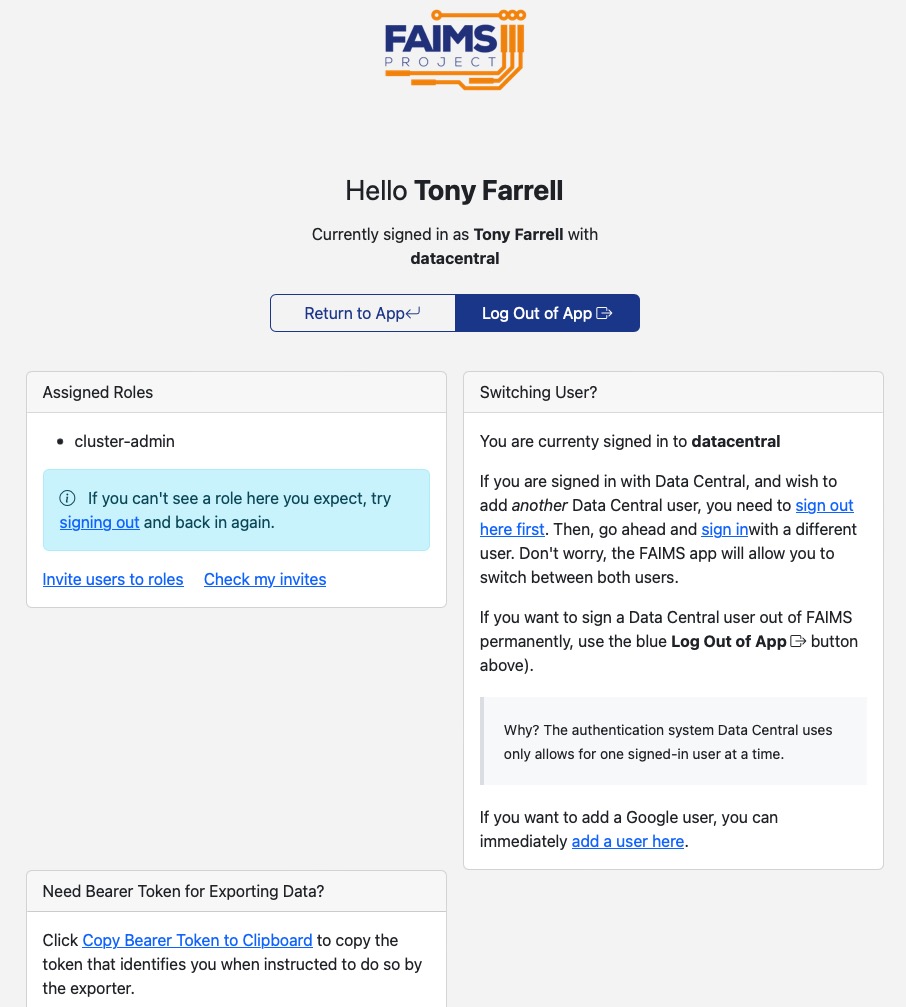
It is possible use the Field Server to sign into the App itself, but not the authentication server. But once you sign-in to the authentication server, you will remain signed into it as long as you don’t explicitly log out of it or clear your browser cache . The following screenshot shows the screen from which you could log out of the authentication server. DON’T invoke the “sig out here first” link if the WiFi router is not connected to the internet. Normally if you end up with this screen, you just invoked “Return to App”.
Backups in the field.#
It is recommended the you make regular bask ups of your machine and in particular, the data.
Consider backing up field collected data every day significant work has been done.
FAIMS data backups#
The easiest approach in the field will be to back up the docker containers. Additionally, this allows for quick recovery if something goes wrong. Alternatively you can also backup the FAIMS databases
Mounting and location of flash drives.#
A typical USB Flash Drive can be used.
If you are logged into a console graphical environment, most modern linux installations will automatically connect any USB Drive connected to the machine. It is common (e.g. Raspberry PI, likely most Debian) for the device to appear in the directory /media/<user-name>/<device-id>
To eject them, use the graphical interface (if available) or the “eject” command.
Mounting when not using the console#
Create a directory where you want the device to appear, e.g. $HOME/mymount
Execute :
|
With <directory> replaced by the directory name.
You can then read/write to the device via that direction.
Unmount it with
|
Docker Container backups#
Executing the backup#
This page describes how to do backups in Docker. Here is a summary
First list the containers
|
There should be three FAIMS containers, names like faims3_faims3-web-app_1, faims3-conductor_conductor_1 and faims3-conductor_couchdb_1
You need the container id associated with each one, the first column. You then create a commit, which will contain the current status and give it a name.
|
You can not copy them to a tar file, but this will take a while (15 minutes on a RPI). Here I copy them to the tail file docker_backup.tar in my home directory.
|
Note that contents of the resulting tar file is not simple, but you could have a look at the repositories for details of what is contained in the tar file. Also note that in this example, it is created root only access permissions. So to look at it I had to do
|
You probably want to gzip the tar file to save space. I would suggest gzipping directly to your backup flash drive
|
You also need to tar up and copy to the device the contents of the directory you specified with COUCHDB_DATA_DIR** in the** FAIMS3-conductor/.env file.
Restoring from a backup#
You could then restore them with
|
The command “sudo docker images” will allow you to see what images you have.
Also restore the tar file with the contents of the COUCHDB_DATA_DIR directory.
TBD how to move committed image to looking like the original image (rename) and then run.
FAIMS DB backups#
Please ensure you have synced (“refresh” button when you have the notebook open) to the field server first. You will likely need expert help to recover from these.
Full Machine Backups#
Google searches will find many possible approaches to backing up your machine. If using something like a Raspberry PI, you can just clone your SD card - see RPI backup details below.
Probably one of the best approaches is the “rsync” approach. This page describes this how to do this (and there are many other pages). You will need a (or a set of) backup devices (e.g. USB flash drives/disks of sufficient size). One particular benefit of the rsync approach is that when doing a subsequent backup to the same device, it doesn’t copy things that already exist.
As with all backup techniques, you should test this in advance, including recovering from the backup. The later is very easy in something like a Raspberry PI where you can just swap SD card for a new on, create a new build and then recover from the backup.
Disk Formating#
For a full machine backup (rsync approach) you need the format of your backup disk to in a suitable format, one of “ext3” or ext4”. Many off the shelf devices use the “FAT32” format, won’t be reliable (they are ok for the container backups above). This page is for a RaspberryPI, but the basic approach will be similar for othger Linux distributions
Mounting of the backup disk#
If you are logged into a console graphical environment, most modern linux installations will automatically connect any USB Drive connected to the machine. It is common (e.g. Raspberry PI, likely most Debian) for the device to appear in the directory /media/faims
To eject them, use the graphical interface (if available) or the “eject” command.
Mounting when not using the console#
Create a directory where you want the device to appear, e.g. $HOME/mymount
Execute :
|
With <directory> replaced by the directory name.
You can then read/write to the device via that direction.
Unmount it with
|
Backup Schedules#
You should ensure you have some schedule of backups to multiple locations, optimised to the environment you are in. The example below might be appropriate for a location where work is being undertaken during the day in a field location back staff are staying in a town overnight but a town with very poor internet connectivity. In this case, it might be that the data collected would be very hard to recover if lost.
Before Travel → Determine your full disk backup approach. Create a full backup and ensure you can recover using it. If not, adjust your approach until you have a documented approach to back up and recover.
Before Travel → Ensure you have the backup devices required below (in this case, two/three USB flash drives for data only backups, and three devices for full backups of a type dependent on the size of disk in your machine)
Immediately Before Travel → Create three full backups of the machine. One to be left in the home location and two to be taken.
Every day → Backup FAIMES data to a USB Flash drive. At least two flash drives of the appropriate size will be used and will be rotated.
Every week → Full backup of the machine to a drive of the correct size. Again at least two drives of the appropriate size will be used and rotated.
Every week if possible (e.g. sufficient internet service available) → Copy XXX back to your home location
Of course, this is just an example. Please adapt to your situation - but please be very certain (before you travel) that you can recover the data using the approach you have taken.
Docker commands of note#
This is a summary of the docker commands used above. There may be better options and certainly are alternatives, but these are what was used.
| sudo docker-compose up -d | Must run in the directory with the source of the container Builds the container image if needed (including partial builds if it knows how to do this)
Starts the docker process as a daemon (-d option) |
| sudo docker ps | List the running docker containers. |
| sudo docker ps -a | List all docker containers. |
| sudo docker-compose restart | Must run in the directory with the source of the container Restart a docker container |
| sudo docker-compose down | Must run in the directory with the source of the container Stop a docker container |
| sudo docker-compose down --rmi all | Must run in the directory with the source of the container Stop a docker process and remove the container images. Use this followed by a "sudo docker compose up -d" to force a rebuild of the container image. |
| sudo docker update --restart=always <container>... | Ensure the container will restart on a reboot. Get <container> id using the "docker ps" command. Multiple containers can be specified. |
| docker --help | Full help |
| docker <command> --help | Get help on a particular docker command |
| docker-compose --help | Full help |
| docker-compose <command> --help | Get help on a particular docker command |
| sudo docker info | Output details of docker on the machine. Of particular interest is the value for "Docker Root Dir:" which tells you where your docker containers are stored |
| sudo docker logs <container> | Output the log of a container. |
| sudo docker logs -tf <container> | Equivalent of "tail -f" on the docker log file. The "t" adds time tags to the output. |
| sudo docker system prune -a | Remove all unused (not running) images not just dangling ones |
| sudo docker system df | Show docker disk usage. |
| sudo docker exec -it <container#> /bin/bash | Connect to the container, create and interactive window and run bash. Allows you to connect directly to the docker image and say examine log files. |
Design of FAIMS system (outline)#
This is not meant to be a full description of the FAIMS design - it is a reference for setting up a field server only.
FAIMS has three components :
The Web Application (WebApp). This is a program which runs in your browser (or within the FAIMS Application on iOS or Android).
Conductor - which details with authorisation
CouchDB - the database on the server.
When you connect to the FAIMS front page - it downloads the Web Application to your device. If you are using the iOS or Android application, the application is just packaging up the Web Application.
The WebApp knows the location (Public host name and port number) of the CouchDB implementation. It first connects to CouchDB with the information and is given the location (Public host name and port number) of Conductor.
The WebApp can then connect to Conductor to run the authorisation process, using a OAuth 2.0 Authorisation Server (Data Central or Google).
Once authorised, the WebApp can duplicate relevant bits of the CouchDB database into its own database - Pouch DB. It will allow you to select the FAIMS DBs you need to use and will synchronise them to Pouch DB.
The image below shows this data flow.
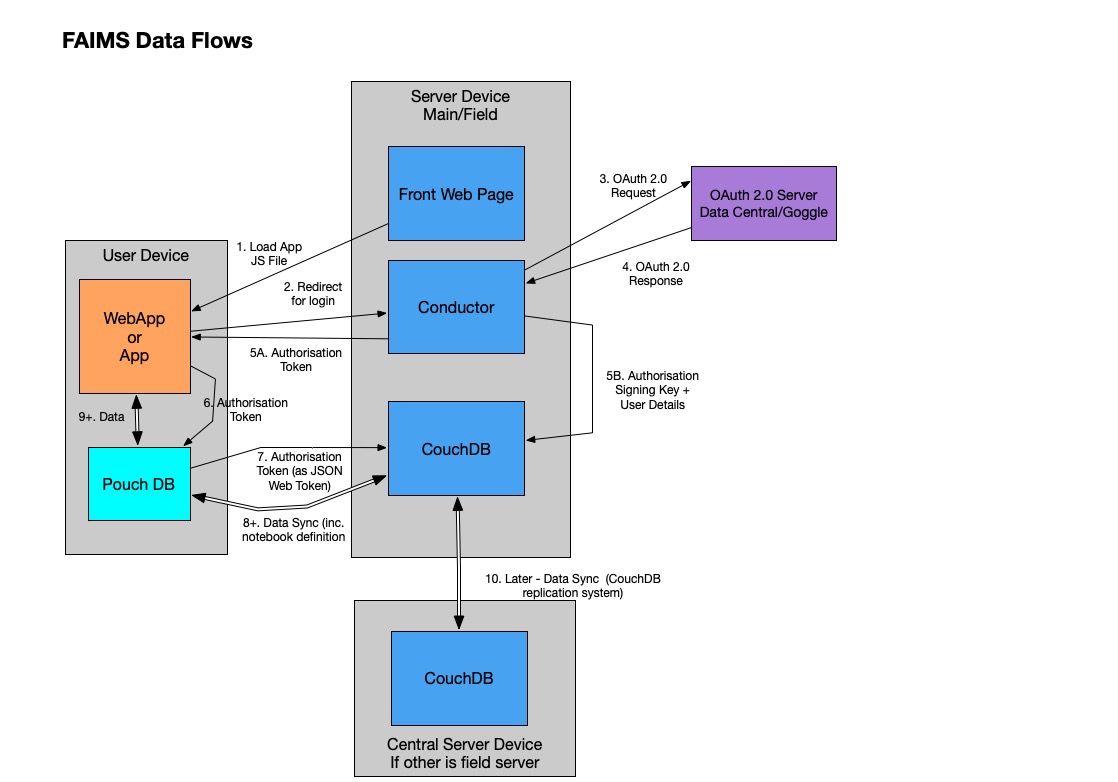
What is not shown above is the use of HAProxy. This allows public (SSL) interfaces to the three components to be distributed to their implementation Docker containers. The HAProxy implements a frontend which can work out to which backend (Front End Web Page/Conductor/CouchDB) a message should be sent based on the DNS name and/or the port number of the incoming message. In the main FAIMS server, each of the Web App, Conductor and CouchDB have their own DNS entry and the HAProxy configuration uses that to work out the backend to use. In the example field server implementation, the same DNS entry (hostname) is used for all three, the incoming message port number determines which backend is to be used.
The image below shows the communications path, particularly for the field server implementation and indicates where the various items are configured.
Raspberry Pi Set up#
We used a “Raspberry Pi” as an example install and this section explains what was done. What was done here should in many ways be close to what is needed for any field server.
This was done with a Raspberry Pi 400 kit (A kit which has the computer built into a Keyboard). The kit included an initial boot micro SD card but this was only 16Gb and the version of the OS was well out of date. I bought a 32Gb micro SD card and ensured I had the ability to read/write this with my laptop. (I don’t believe a “Raspberry Pi” can use an SD card larger then this ). I was using a Mac Laptop so the process might be a bit different on a PC, but should be close.
I downloaded the “Raspberry Pi Imager” app from https://www.raspberrypi.com/software/ . This app will write the OS to the micro SD card
Insert the micro SD card into you computer’s reader/write
Start the Imager App
Choose the OS → “Raspberry Pi OS (other)” → “Raspberry Pi OS (64-bit)”
Choose the Storage. It will offer you various things your machine might see - look for the 32Gb item.
Invoke the “Gear” button (lower right). This will allow you to make some default settings, e.g
Hostname.
Enable SSH
Set the user name
WiFi network to connect to
Locale Settings
Invoke “Write”. This will write the disk and verify the results. I have at least once seen a verification failure, I just repeated the operation.
The process took about 8 minutes for me.
Remove the disk (it does not need to be ejected, at least, on a Mac)
Insert the disk in the “Raspberry Pi” and power on. For the process from here you will want a monitor connected to the “Raspberry Pi”.
It will spend a bit of time sorting itself out, screen going blank a number of times.
Eventually you will get a desktop. Hopefully already connected to your local network.
The time should be set correctly
Try “ssh-ing” into the machine, e.g. using “ssh <name>.local” where <name> is the host name you choose.
This ensures it is on the network correctly and that you have the password is correct.
Start the software updates. There should be a button in the top toolbar, probably the first one of the set on the right.
Reboot to apply them.
From the “Raspberry” menu - select “Preferences→Raspberry Pi Configuration”
In the “System” tab
Change the Hostname if required.
Consider “Boot” and “Auto Login” options. You will probably want to change them to “To CLI” and “Disabled” (but could leave them as is whilst setting up)
Invoke Ok.
In the “Interfaces” tab, you probably want to enable “SSH” if you hadn’t already done this. This will also remote logins using the “ssh” command. Reboot when it prompts. Check the settings are correct on reboot.
Now increase the swap space on the RPI (to 4096) - See below.
Then work through the installations,
Backing up the SD to Mac#
You might want to do this before you start installing or maybe just when you have finished installing things.
I worked through this process. I then compressed this (before compression - was about 31Gb)
The writing of this takes a long time - check the file size to see it growing.
Command used - sudo dd bs=32m if=/dev/rdisk4 of=raspberry_pi.dmg
But do beware the the 4 is likely to change and you will want to change the filename
This took 20 minutes. And then compression took another 12.
And remember - at some point you need to test that you can restore. Grab another SD card and try resorting to it and confirm the result works as expected.
Installations#
First - you need to add support for backports to the package manager. From, add
|
To /etc/apt/sources.list and then run “sudo apt update”.
| What | Install command | Comments | ||
|---|---|---|---|---|
| Git | sudo apt-get install git | Was already installed | ||
| Docker | sudo apt-get install docker | |||
| Docker Compose | sudo apt install docker-compose/bullseye-backports | Lots of stuff needed for this. Use need the back-ported version (1.27) rather then installed 1.24. | ||
| HAProxy | sudo apt-get install haproxy/bullseye-backports | Without backports, we are on version 2.2.9, backports gets us to 2.4.18, still somewhat behind the current 2.7 version! Must be complied with "Lua" support. To check this, execute
And the output should include
|
||
| Text Editor (e.g. nano, vim) | sudo apt-get install nano | Nano was already installed Vim was already installed. |
||
| Telnet | sudo apt-get install telnet | Optional, To help with testing | ||
| Locate | sudo apt-get install locate | Optional, Helps in finding files. But does use resources! | ||
| Dnsutils | sudo apt-get install dnsutils | "dig" and "nslookup" commands and others, used to work with DNS. Likely optional (TBC) | ||
| DNSmasq | sudo apt-get install dnsmasq | DNS/DHCP server. So we can provide a DNS server |
Upgrade everything else at this point
sudo apt-get upgrade
And then reboot to be sure everything workw.
You can now start working through the FAIMS installation above.
Set /etc/hosts entry for machine. This must be consistent with the SSL Certificate to be used - see above
DNSMasq - DNS server installation#
We install this so that field devices can find the component of FAIMS. The Field server needs to be specified as the first DNS server for any WiFi system which is connecting devices to the Field Server.
Dnsmasq is a lightweight, easy to configure, DNS forwarder and DHCP server. It is designed to provide DNS and optionally, DHCP, to a small network. It can serve the names of local machines which are not in the global DNS. We will not be using the DHCP side of it - since our WiFi router provides that.
AFter installing DNSMasq, ensure /etc/hosts has the IP address of the RPI, e.g.
10.80.17.250 faimsrp1.site.org.au faimsrp1
You will probably need to restart the service after changing /etc/hosts, do that by executing “sudo service dnsmasq restart”.
Adding Swap space#
The Raspberry PI conmes with 4Gb of memory and by default is configured for only 100Kb of swap space. Thi may not be/is not enough. Presuming you have moved to a 32Gb SD card, you can expand Swap space say to 4Gb of swap.
The approach is described here (but is very much a Debian approach). Note that the value you set in CONF_SWAPSIZE cannot exceed the value in CONF_MAXSWAP, but you can update both.
Note - the “free” command is probably the easiest way to see what memory you have available.
Require SUDO to ask for a password#
By default, it seems the “Raspberry PI” sudo command is configured to not require a password. This is ok when playing and initially setting up, but it NOT OK in a deployed system!
This is set in the file “/etc/sudoers.d/010_pi-nopasswd” , which you should only edit using the “visudo” command.
so you can edit it by:
|
and change
|
to
|
(i.e. remove ‘NOPASSWD:’)
and save and close.
if you make any mistake (configuration is checked when you exit the editor), it will prompt that… .Press e to go back to editing NEVER PRESS q!!!
Issues as of 09-Feb-2023#
Testing on the iOS App shows problems.
After adding the directory entry - you see a new entry in “Users” on the App.
When there was some flaw (unclear) in the entry, it appears with a “Sign-In” button. I was able to sign in (using my existing credentials) and it works. But if I invoke the “Done” button, I then can’t sign in again until connected to the wider network.
James thought this we because conductor specification was wrong in the main DB entry.
But this entry had disappeared
With the revised specification, you get a different layout, no sign-in button, just a basic clone of the main sign-in area but mentioning the RPi database
James explained that we should now see a merged set of databases in the workspace
This required that I rename the RPi database to make it distinct (replicate it and change the configuration DB entries).
But - whilst I am clearly setting the new RPi database entries, I don’t see the underlying DB in my workspace.
Additionally - back on the main server, the additional DB entry has now disappeared!!!
The Safari browser on the iPad works correctly thought all of this, the problems are in the App only.
Issue Summary:#
The iOS App is not working correctly. (Browser on iOS app seems to work well).
The Android App has not tested.
The required entry in the main FAIMS “directory” testing DB was disappearing (happened twice). We do not know why, it may have been due people restoring the database from a backup during other testing.
Warning
The documents above need modification such that when we replicate the DB, we rename it in the process. But this is only relevant once the iOS App issues are resolved.
haproxy and cors.lua#
Notes on how cors.lua allows haproxy to implement the FAIMS connections.
Under development (13-Jan-2023)
cors.lua#
cors.lua claims to implement “Cross-origin Request Sharing (CORS) implementation for HAProxy Lua host”.
Source at GitHub
From the GitHub README.md file:
|
In the global area of haproxy.conf, we to load the configuration file. This is how it is done:
|
Then in the frontend section, we capture the Origin request header using the http-request line.
|
From the GitHub page:
“GET,HEAD,PUT,PATCH,POST,DELETE” → comma-delimited list of HTTP methods that can be used. This is used to set the Access-Control-Allow-Methods header.
“webapp.test,localhost,localhost:3000,localhost:3333,localhost:8080” → comma-delimited list of origins that are permitted to call your service. This is used to set the Access-Control-Allow-Origin header.
“Content-Type, Accept, X-Frame-Options, Authorization” → comma-delimited list of custom headers that can be used. This is used to set the Access-Control-Allow-Headers header.
Again in the frontend action, need to add this line, which attaches CORS headers to responses from backend servers.
|
So it looks to me as if this just does the header rewrites as required, not actually invoked in selecting the backends
HaProxy Backend selection#
I think this is the line that does the work
|
And what we need to select from is
|
Each of the back-ends are running (assuming the three docker images are up)
use_backend#
|
Note - the 503 error we are seeing is a specified response to occur if the backend is not found.
Take out the “backend-certbot” related lines. We don’t have the underlying files.
Fetches#
This format is a (I think - TBC) a “fetch”.
|
http://docs.haproxy.org/2.4/configuration.html#7.3
The req.hdr(host) is requesting the host from the header. They also seem to be used in log-format statements but are different in some way.
req.hdr →This returns the last comma-separated value of the header <name> in an HTTP request.
http://docs.haproxy.org/2.4/configuration.html#req.hdr
We then convert it to lower case and extract the first word.
Summary at this point#
It looks like the use_backend specification is switching to a backend based on the incoming host name
Yes that it what is happening. On the main running system, we have for example
|
And the address we use for faims3 testing is testing.3.faims.edu.au. So when that is invoked on this HA Proxy, it will call the first backend specified there. The other addresses all exist and can be invoked.
So:
What if I have a fallback of goes to the web-app.
Then need to work out how the node names are specified for the others.
Log format#
log-format frontend:%f/%H/%fi:%fp\\ client:%ci:%cp\\ GMT:%T\\
body:%[capture.req.hdr(0)]\ request:%r
See http://docs.haproxy.org/2.4/configuration.html#8.2.4
| %f | frontend_name |
| %H | hostname |
| %fp | frontend_port |
| %ci | client_ip |
| %cp | client_port |
| %T | gmt_date_time |
| %[capture.req.hdr(0)] | |
| %r | http_request |